Monday, September 29, 2014

Coffee Lovers Bloghop!

Hey everybody,

Welcome to the Coffee Lovers Blog hop organised by Chaitali and Amy


I am a coffee lover and my day starts with a good cup of coffee every day without fail. Then one at about 3:30PM.  Back in my younger days in India, I loved filter coffee. Oh, the aroma of filter coffee early in the morning is very nostalgic to me. After migrating to Australia, I quickly got the taste of Italian coffee. Melbourne has a great coffee culture. I loved it. That when I bought a coffee machine (manual) trying to mimic the coffee bought from the shop. It was a lot of work to get the right proportions of coffee and froth and milk in the cup.  Soon upgraded to an automatic machine which I still own. Now that I have discovered the Nespresso machine, the automatic have gone into its box in the shed. My favourite Nespresso coffee pod is the purple Arpeggio. So my card for today's Coffee Lovers Blog Hop is inspired by one of Nespresso brochure that came recently. Here is my coffee card.

Let's chat 2

I have used the ray stencil from MFT to sponge the Frayed Burlap and Mustard Seeds. I also sponged some Delicata gold ink to give some shine. The coffee cup and sentiment is from Lil' Inkers Design. I die cut the cup and coloured using copics with adding some Ice Candy distress glitter for the froth. I then white heat embossed the sentiment on the cup. 

Coffee and Friends

For the bottom part of the card front, I have used wood pattern paper from My Mind's Eye wood paper pad. I sponged some Mustard Seed on the pattern paper to colour coordinate with the rest of the card. I trimmed the paper at an angle so the coffee cup is glued at the centre using foam adhesive. The angled cut gives depth to the card. 

Let's Chat flat

The other sentiment is white heat embossed on the wood pattern paper towards the bottom of the card. Here is a closeup of the card.

Let's Chat - Warm

Check out Chaitali's blog to see more inspirational card from coffee lovers. 
There are a lot of prizes from these awesome sponsors.


For more details check out Chaitali's blog.

Thanks for stopping by!

My blog signature

Friday, September 26, 2014

Tag You're It Challenge #7

Hey my dear craft friends,

Today's Tag You're It challenge is special for me because the designer inspiration tag card is mine.
Here is my tag card. 


Inspired by my tag card, I made another wedding card with double tag. 

You & Me! Vertical

I have die cut the chevron tag using pattern paper and PTI tag die. For the smaller tag, I sprayed Irresistible gold spray from Tsukineko on white card stock. This spray give some texture as well. I love it. When dry, I die cut a smaller tag using die from Wplus9. I layered the tags using foam adhesives. Then diecut a few ampersand from PTI from white cardstock and one from silver glitter paper. I stacked and glued them.Adhered this on the tag. Then stamped the sentiment on strip of white cardstock, cut at an angle and adhered using foam adhesives.

You & Me flat

The chalkboard background paper is pattern paper from Simple Stories The Story of Us 6 x 6 paper pad. So is the Chevron paper on the tag. Finally I added some gorgeous rhinestones from Simon Says Stamps. Here is a closeup.

You & Me!

It is you turn to play along. Head over to Tag You're It Challenge Blog to see what the other designers did with the tag. You can also find the linky to link your project at the blog. 

Thanks for visiting. Have a great day!

My blog signature

Thursday, September 25, 2014

CASE Study #210


Hello everybody,

Welcome back! I am sharing with you the last card from Debby Hughes as CASE Study Challenge muse. I love CASEing Debby's cards and sad that this is the last one for CASE study challenge. I thought I should make the most of it and got carried away CASEing this beautiful card of Debby's.


I love the stenciled background and cluster of feathers, berries and leaves falling with the bow and banner sentiment. I have used these elements on my CASed card below.

Merry Christmas


Merry Christmas card flat

And I have a slideshow of how I made this card (s) below.


Hope you are inspired with my card and join me and rest of the CASE Study team for the last challenge. Did I say "last challenge"? Yes, I am very very sad to say that Chupa is suspending the CASE Study Challenge as of the end of this challenge. She needs time to spend with her family especially with her Chuplets.We all understand FAMILY comes first. But as I said, the challenge is only suspended. So when Chupa has more time, she will bring the challenge back.


Come and play along with us.
My blog signature

Sunday, September 21, 2014

Wishing Well - Curtain Call Challenge reminder!


There is still time to join us for the Curtain Call Inspiration Challenge: Wishing Well!  You have until September 25th at 8:00 AM CDT to be inspired and share your project!


Current challenge details and link-up are HERE
This is my second card for the challenge using Clearly Whimsy Stamp Set called: Travel 1 - Life is a Journey.

Adventure card vertical

I have gone with the colours form the inspirational graphics to make my card. 

Adventure card flat

And I went for a trendy layout. I simply stamped the road on the card front. Then stamped and cut out the cars, one of which I adhered using tape and other using foam. I then stamped the sentiment in black. Added some more elements like the arrows and camera. Finally finished off with some enamel dots.

Adventure card closeup

We look forward to seeing your creations!

Be sure to stop back on September 30th for the Lead and Show Stoppers from this challenge.
Then come back on October 1st for the next challenge!

Thanks for stopping by!

My blog signature

Thursday, September 18, 2014

CASE Study #209

Hello everyone,

I am a little late to share with you my CASE Study Challenge card today. But I am here now.
This is Debby's muse card for Challenge #209

I LOVE white on Kraft. The combination is so elegant. And what an elegant holiday card this combination will make? That is what I have gone for. The other element I am inspired by in Debby's card is the wreath, use of sequins and sentiment on vellum. Here is my CASE card.

White on Kraft slide8

Well, I have a slideshow to show you how I made a this card, rather a similar card. It is self explanatory but I have a lines describing each slide as well. Enjoy!


Come and play along with us.
My blog signature

Tuesday, September 16, 2014

Runway Inspired Challenge #68


Hey everyone,

I have a new Runway Inspired Challenge for you to play along.
This time it is not a fashion clothing but a shoe! 


How cool is this shoe? I love the texture of the cork and the argyle design. Inspired by them, I created my card. Here it is!

Happy Birthday shoe card

I have used PTI's A Little Argyle background stamp set to stamp and white heat emboss my background on watercolour paper. Then I randomly coloured the diamonds with colours from the shoe using Peerless watercolour. I loved a lot of white space and pop of blue, red and brown colours.
Then I trimmed a cork paper for the centre panel. The shoes are from Clearly Besotted's Stepping Out stamp set. I simply black heat embossed the shoes, watercoloured and cut them out. I have layered them using foam on one. The sentiment is also from Clearly Besotted Stamps called Basic Banner. The gorgeous Sparkly Clear sequins are from Pretty Pink Posh.

Happy Birthday flat 1

Pretty happy with the how my card turned out as this was not what I planned to make when I sat to craft.

Check out Runaway Inspired Challenge Blog to see how the rest of the designers interpreted the challenge. Now it is your turn to play along. Cannot wait to see what you do :)

Thanks for stopping by!

My blog signature

Monday, September 15, 2014

Curtain Call Inspiration Challenge - Wishing Well!


It's time for a new Curtain Call Inspiration Challenge!


We have a wonderful new sponsor, Clearly Whimsy Stamps, for the Curtain Call Inspiration: Wishing Well


 A randomly selected participant in the Wishing Well challenge will receive $25 store credit to Whimsy Stamps and the LEAD will be invited as Guest Designer of a our next challenge!

Whimsy Stamps were generous to provide me with this stamp set and coordinating  die as well. This stamp set is called Travel 1 Life is a Journey

So thank you so much for providing the stamp set and die.
Here is my interpretation of the Wishing Well graphics using Travel 1 Life is a Journey stamp set and die.

Zooming by edited

I have gone with the colours for inspiration. I love the pink and yellow flowers and the grey of the wishing well. I decided to use pink and yellow more and less of green. My background is made using watercolour paper colourwashed with Picked Raspberry and Mustard Seed distress ink. I then used the circle dies to die cut out the various sized circles. I have layered them at different dimensions using foam and tape adhesives.

I then die cut and stamped the aeroplane from the stamp set which I mounted using foam adhesives. I stamped the sentiment on a strip of white card stock, which I trimmed at an angle.Finally accented with some gorgeous mint and mossy green sequins from Pretty Pink Posh.

Zooming by flat1

Make sure you visit each of the designers' blogs for more inspiration!

Wishing Well Designers

My blog signature

Friday, September 12, 2014

Tag You're it Challenge #6

Hey everyone,

I have a new tag inspiration from Tag You're It challenge for you today.
This  gorgeous tag is by one of our designer from TYIC -  Karin Akesdotter.


Beautiful pastel colours and love the placement of the flowers and the font of the sentiment. I am inspired by these but being a bright girl, I went for something bright.

Season's greetings

I have used black tag from American Crafts. The poinsettia is from MFT which I have stamped using Festive Berries distress ink and water coloured. I did two of these. Cut one in full and other the centre layer only. I then stamped the poinsettia in Mowed Lawn distress ink and watercoloured. On this one, I cut the periphery to use as leaves. I then just layered the centre layer of the poinsettia over the full poinsettia then the leaves under the full poinsettia. I adhered this layered watercoloured poinsettia on the bottom of the tag. Then white heat embossed the sentiment also from the same set from MFT. Finally accented with gold sequins from Pretty Pink Posh. I love the colour contrast of the flowers against the black background. 

It is you turn to play along. Head over to Tag You're It Challenge Blog to see what the other designers did with the tag. You can also find the linky to link your project at the blog. 

Thanks for visiting. Have a great day!

My blog signature

Sneak Peek of Colour Challenge at StampNation


Hiya everyone,

Sharing sneak peek of my card for this week's challenge at StampNation.


It is a colour challenge. Beautiful fall colours. Here it is.

Happy Birthday to you closeup!

If you are new to stamping or cardmaking, Stampnation is your place to be because it has loads of tutorials, videos and a gallery of inspiration. If you are already a stamper or cardmaker, StampNation is still your place because your have an awesome group of friends with whom you can chat anything craft.  On the whole, it a great place for cardmakers. Check it out - HERE

I will see you soon :)

My blog signature

Thursday, September 11, 2014

Housewarming Par tay!


Hey everyone, It is me again. This is my third post for today. Here is my CASE Study Challenge post and Create A Smile new release Blog Hop.

So what is this housewarming party I am talking about? My good friend Catherine Pooler is celebrating the launched her new website. 


I am participating and celebrating with her. Excited! As part of the celebrations, Catherine is also having a challenge. Of course, there are tons of prizes by some awesome sponsors worth $300 and one year subscription to StampNation. How good is that? 

So theme of the challenge is HOME. It can mean a house, family, love…you can even use the letters of the word HOME for inspiration (H-alloween, O-mbre, M-ixed Media, E-mboss).  Get creative and have fun!

Here is my card for inspiration.

Congratulations vertical

Congratulations closeup

I have made this colourful congratulations card to wish Catherine on the launch of her new gorgeous website. so congratulations, Catherine on your new website. It is beautiful, with nice readable fonts and user friendly. 

You should have known or heard of StampNation either through Catherine, myself or several designers. StampNation is a great online community for cardmakers full of tutorials, videos, gallery full of inspiration and forum full of great discussion. It is a great source for any cardmaker from beginner to advanced. Check out all about StampNation HERE.

http://www.cartville.com/app/?Clk=5189769

I am giving away one month free subscription to StampNation. Please leave a comment on my blog by 17th September and I will pick a winner on 18th. For more details on how to play, head over to Catherine's Blog.

Thanks for stopping by!

My blog signature

Create A Smile Blog Hop

Hey everyone, 

This is my second post for today. This is my CASE Study challenge post.

Welcome to Create A Smile Blog Hop.


Create A Smile are a new stamps company in town - their first stamps were released in July 2014. The stamps are made of high quality photo-polymer and produced in Germany. They will for sure make you smile!

Create A Smile is releasing three sets TOMORROW! Here are the new set.


You can find their store at www.createasmilestamps.com, the stamps will be available for purchase at 8am CET (2am EST). 


To celebrate the new release, a few of us designers are participating in this blog hop showcasing the new stamp sets. You should have arrived here from Kelly Latevola's blog. But if this is your first stop don't worry, I will give you the list of designers participating in this blog hop towards the end of the post.

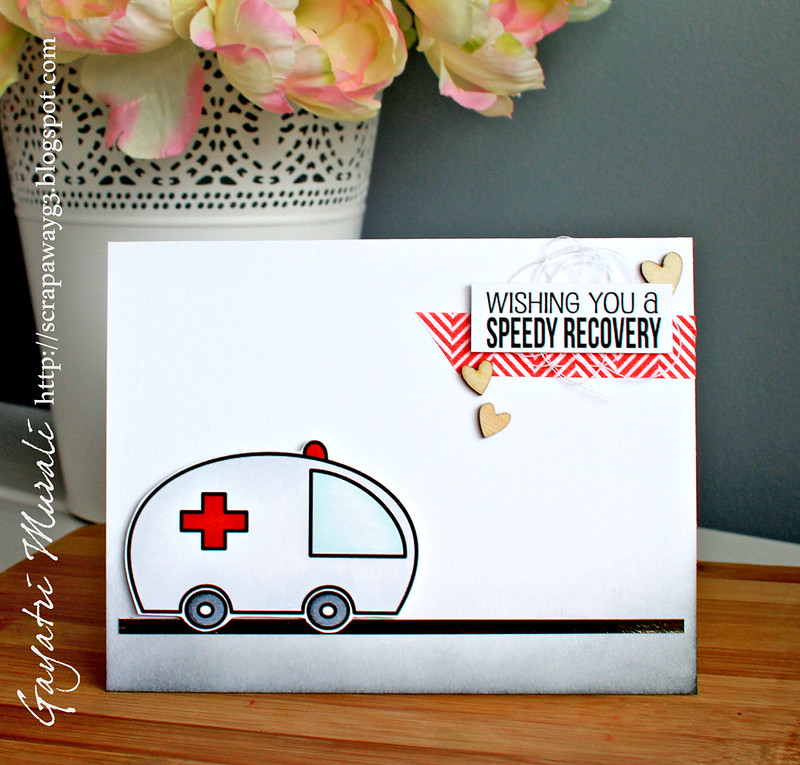
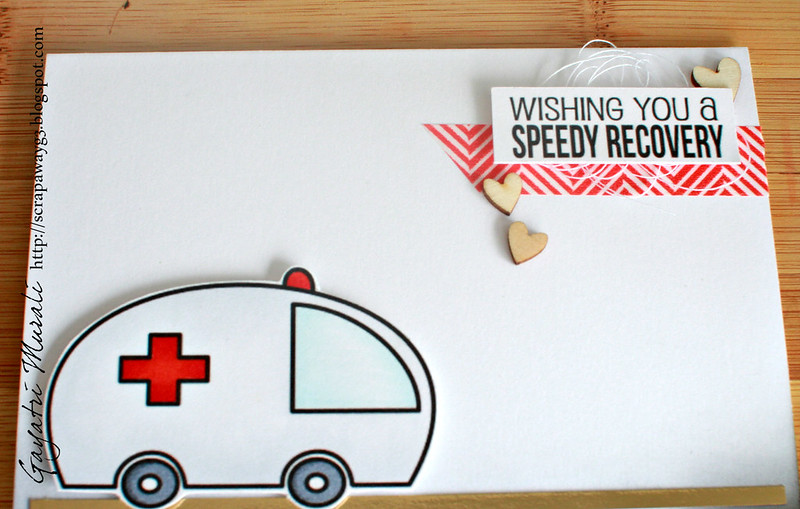
Here are my projects using the new stamp set. This first stamp set I have used to make my card is called Whimsical Wheels. I love this set because of the cute transport images in this set. Not to mention the sentiments that go with it. The cute transport images are great for colouring in. Oh! you will find that my images and sentiments are larger than everybody else. That is because I am using digital images of the stamp set. So I have altered the size of the images before I printed them out an coloured them.

Speedy recovery vertical

I have used the ambulance image from the set which I printed, coloured and cut it out. I also printed the sentiment and trimmed it down. One the card front, I sponged Black Soot distress ink so very slightly at the bottom of the card. I then glued a thin strip of gold foil cardstock. I mounted the ambulance using foam adhesive.

Speedy recovery closeup

For the sentiment, I added Kelly Purkey red chevron washi tape and then added some bunched up thread before adhering the sentiment using foam adhesive. I then added some cute tiny heart wood veneer. I simply love how the card turned out. Eyes focuses on the ambulance and then diagonally drawn to the sentiment. Simple and focused.

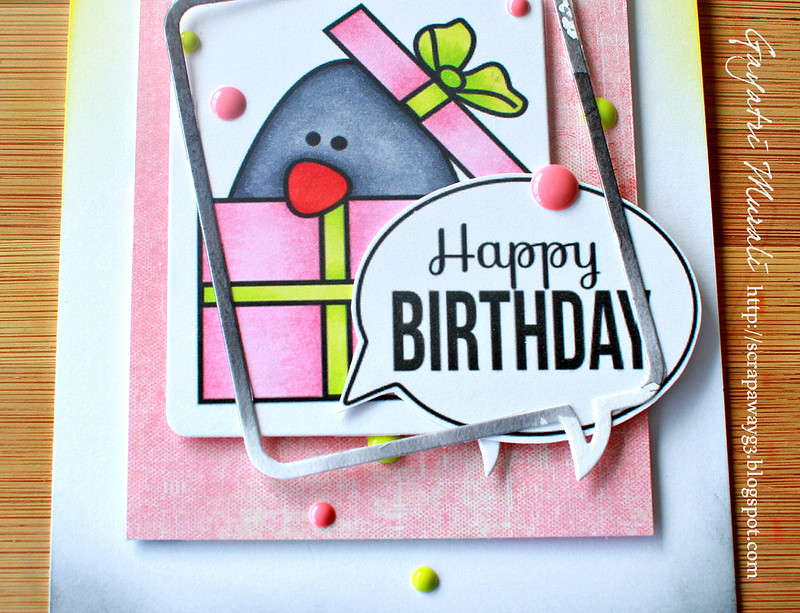
Now to my second project, I have used the second new stamp set called Penguin Party. as the name suggest, the set has some adorable penguins in this set which is again great for colouring. On my card below, I have used digital image, so my images are altered in size and therefore larger in size.

Happy Birthday card2

I printed the penguin inside the gift box image coloured it, then diecut using Speech Bubble Insert die from Simon Says Stamp. This die has the solid die and then also cuts  the frame speech bubble as well. i have die cut the frame speech bubble using a scrap watercolour paper coloured washed with Black Soot distress ink. this gives nice texture. I have printed the sentiment speech bubble from the Penguin Party stamp set and cut it out.

On the card front, I have sponged some Mustard Seed distress ink on the top of the card front and Black Soot on the bottom of the card front. I then trimmed a pink pattern paper which I mounted on the card front using foam adhesives. Then layered the speech bubbles at various angles and diemensions using foam adhesives as well. I have used enamel dots to accent the colours of the image. Here is the close up.

Happy Birthday closeup

Hope you are inspired by my projects. These sets are so adorable and must have sets. Now hop to the gorgeous Christine Drogt's blog. Christine is the owner of Create A Smile. Here is the list of all the designers participating in the blog hop.

Gayatri Murali (this is me!)

No blog hop is complete without a prize, right?  You can win a 12,50€ gift-certificate for the store - all you need to do is hop along and leave comments on all the fantastic and inspiring stops (one comment per person, per blog please!). We’ll pick random winner from all the comments - so the more blogs you visit (and leave a comment on) - the more chances you have to be a winner!


You have until Saturday September 12th, 8am CET (that's 2am EST). The winner will be announced on the Create A Smile Blog on Sunday (September 13th)

Have fun hopping and don't forget to leave a comment ;)

My blog signature